EASY FLARED TUBE SPACERS
10/29/2021Easy
Flared Tube Spacers
By Bill Fretz
Sterling and Ebony Necklace
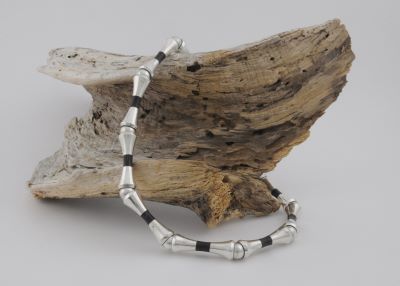
Jewelers often find shapes that become part of their design vocabulary. I became enamored with the concept of the ball and joint look by adding a concave shape between round beads while at the School for American Craftsmen back in 1969. My senior thesis piece was a necklace design made of sterling and ebony. Each of the twenty-six cones was formed on small a tapered horn t-stake. It couldn’t have been more labor intensive. Over the years the idea of simplifying the process became mandatory when we had to make jewelry in a timely manner. The challenge of making a simple tool became necessary when our shop needed to make multiple concave tube spacers. Here’s the easy solution, in a simple set of mandrels, for various size tubing with a holder.
Three Two-Part Mandrels and Holder

The set of three Tube Forming Mandrels, TFM-1 thru 3 and the TFB-1 Base Holder cover a tubing size range with an inside diameter of 3mm to 8mm. The simple way of using the split mandrel is to first place a length of tubing between the two parts of the mandrel. The mandrels have a pin in the middle of the bottom unit to keep the two parts aligned. The mandrel is then struck with a brass-ended hammer and the tubing is evenly flared.
Tube Cutting
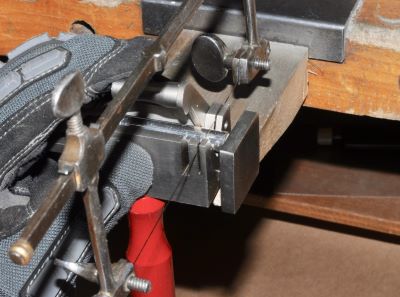
The first step is to cut the tubing to the desired length. The capacity of the mandrels is from 4mm to 8 mm in tube diameter to about 3mm to 12mm in length. The wall thickness is up to 22 gauge. If available, use annealed seamless tubing as it will not break during the metal-stressed flaring process. If seamed tubing is used, it needs to be soldered with hard solder and then annealed. Put flux on the sterling tubing to prevent fire scale during annealing. Polish the tubing before you cut it, as the small concave pieces are harder to buff later. Use a tube cutter with a stop gauge, and saw blades with 2/0 or finer blades, to make multiple tubes with identical lengths. The tube cutter also keeps the ends even and parallel. This is important as the tubing needs to flare evenly. Keep material records of your projects in case repairs are needed or if you want to duplicate your design later. ***It is easier to texture tubing before they are cut in length as some hammers do not fit in the concave spacers after they are formed
Flaring the Tubes
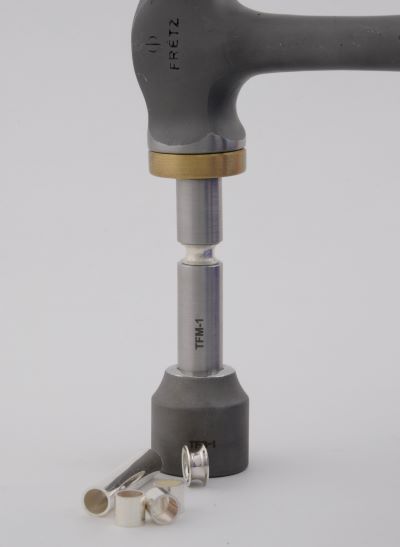
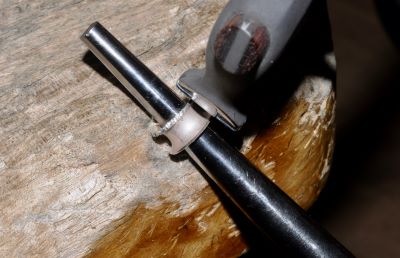
First, choose the mandrel with the largest curved taper that fits inside the selected tubing. Place the mandrel in the Tube Flaring Base, TFB-1. This makes it easy to have the mandrel stand up straight for tapping with the brass-ended hammer. Next, pull the top part off the bottom section of the mandrel with the center pin. Slide a length of tubing over the pin and align the tubing so the end is inside the tubing. The next step is to put the top part of the mandrel back together by sliding it onto the pin. As the two parts are pushed together the tubing should self-center with the mandrel ends inside the cut tubing.
This is the fun part. Now just tap lightly with a brass mallet the top of the combined mandrels until the tubing is flared to the desired curve. The length of the starting blank of tubing will determine now many blows it takes to get to the desired shape. Keep track of how many times you tap so the next tube spacer will match. This is important if you are striving for a symmetrical look. Do not over hammer the mandrel tips so they compress against each other.
The length and size of tubing changes the look dramatically. If the tubing is really short then the curve will be subtle with these mandrels. Longer tube lengths will relate quite differently with the chosen beads. Designers have choices.
Hammering a Length of Tubing
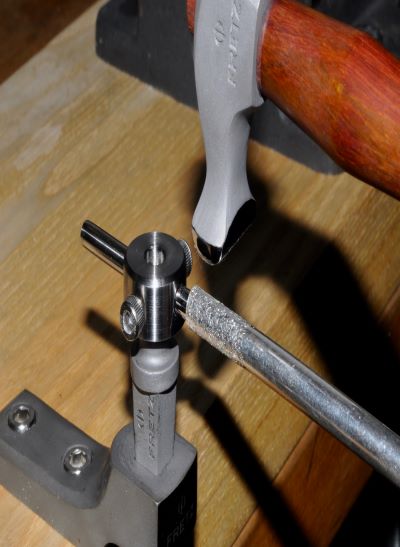
Creative hammer textures can be done before the tubes are cut and flared. Slide 5mm and larger tubing over a straight mandrel held in the H-2 Holder. It is easy to hold a length of tubing while it is rotated and textured over a firmly held mandrel. Thin tubing can be hammer textured by holding it flat on a urethane pad or soft pine wood without using an internal mandrel. *** Texturing a length of tubing before cutting gives you a handle to hold onto. Some of the desirable textures are found on flat hammers that will not fit into the small concave areas after the tube pieces are flared.
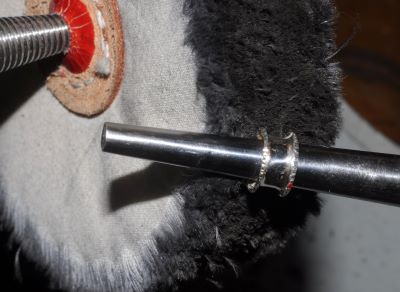
Edge Texturing of Large Flared Spacers
Upsetting an edge by hammering both thickens and textures the edge. On larger tubing you can slide the flared tubing over a round bezel mandrel and hammer the turned out edge. The HMR-12 will make a bold line texture on the edge while leaving the middle smooth if used in this manner.
Texturing the Edge of Very Small Cut Tubes
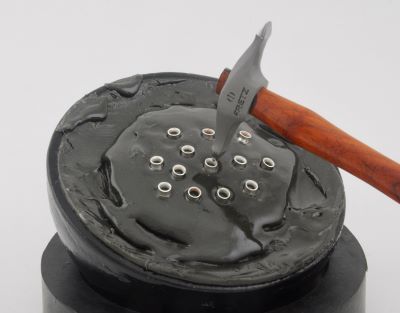
Texturing very small tubing edges can be difficult. The solution is simple.
First gently warm the pitch with a heat gun or torch so it is soft to the touch. Fixture the small cut tubing in your pitch bowl with multiple units facing up.
You can texture all the units at once on one side and then reverse for the other side.
Gently heat the pitch again to remove the tubing pieces.
Use a solvent in a closed jar, such as lacquer thinner, to remove the pitch.
The hammer used was a very small crosspein, HMR-413, to get a sharp lined edge texture.
Buffing
The tube spacers can be buffed on a soft cotton wheel with no stitching. This will maintain the texture without removing detail. Use a polishing compound like white diamond, or a similar product, that is not too aggressive.
Chrysocolla with Spacers
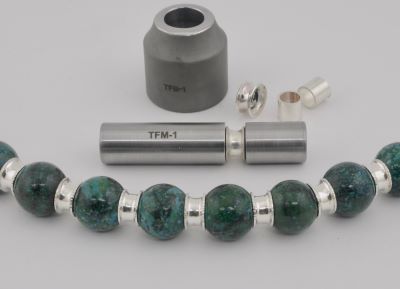
Large 16mm Chrysocolla beads can handle a large spacer. The starting tube blank is 8mm wide by 7 1/2mm long and having a 22 gauge wall thickness. The large tubing requires the largest mandrel the TFM-1. The contrast between the smooth and textured spacer works with the bold pattern of the beads.
Lapis, Onyx and Pearl Strands with Spacers
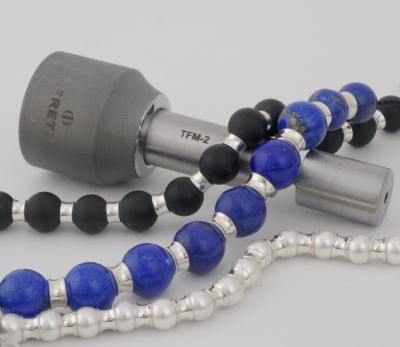
The 11mm Lapis beads used 5 1/2mm tubing in lengths of 4mm to let the lapis remain dominate. The TFM-2 mandrel was used. The sand blasted 9mm Onyx beads used 4.5mm wide by 3mm long cut tubing to get a subtle concave curve on the TFM-3 mandrel. The 6mm Pearls are dominated by the 4mm x4mm spacers. The scale of spacers to the bead size is the important design decision.
Long Spacers
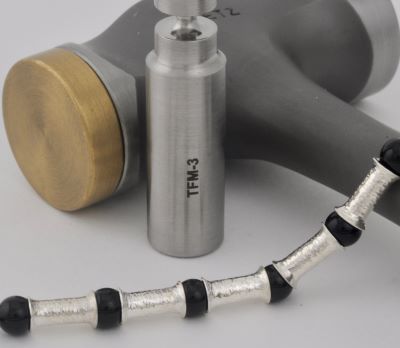
Long spacers can be the main focal point and the beads just a small color accent. An example of this is the 6mm Onyx beads with 4mm wide by 12mm long hammer textured spacers. The hammer used for texturing was a narrow crosspein, HMR-3. The beads are just a way of breaking up the metal elements. The TFM-3 mandrel is used.
Conclusion:
When stringing the flared tubing and beads together, it’s a good idea to knot after each bead. This keeps the ball and joint effect tight, and it also is helpful if the cord breaks, so the beads don’t scatter. The knots will be hidden by the tubing.
The three” Ss”: size, shape, and spacers, can add magic to a beaded project. These mandrels make it possible to do a wide range of spacer shapes easily, while adding your creative innovations to the process.
Tools used:
Set of TFM-1thru 3 Mandrels
TFB-1 Base
Brass Ended Stamping Hammer STH-1
HMR-413 Very Small Sharp Crosspein Hammer
HMR-12 Sharp Crosspein Hammer
Pitch Pot with Rubber Base
Round Bezel Mandrel
Buffing Motor and 4”cotton Buff
Pickle Pot
Torch
Heat Gun
Jewelers saw
2/0 Saw Blades
Tube Cutter Jig
Work Bench
Time:
Cutting each bead depends on the tube size.
About 10 seconds to 30 seconds per piece
Flaring the beads takes about 2-4 blows depending on the tube size
Materials:
16mm Chrsocolla Round Beads
11mm Lapis Round Beads
9mm Sand Blasted Black Onyx Round Beads
6mm Black Onyx Round Beads
6mm Fresh Water Round Pearls
Sterling Tubing:
8mm x 22 Gauge Sterling Tubing
5.5mm x 22 Gauge Sterling Tubing
4.5mm x 22 Gauge Sterling Tubing
4mm x 22 Gauge Sterling Tubing
Note:
A “Tri Cord Beader” was used to make the knots in the string.